My first try at Tunisian Crochet Entrelac!

<NOT!

    My first try at Tunisian Crochet Entrelac!
    now what to make using it….?


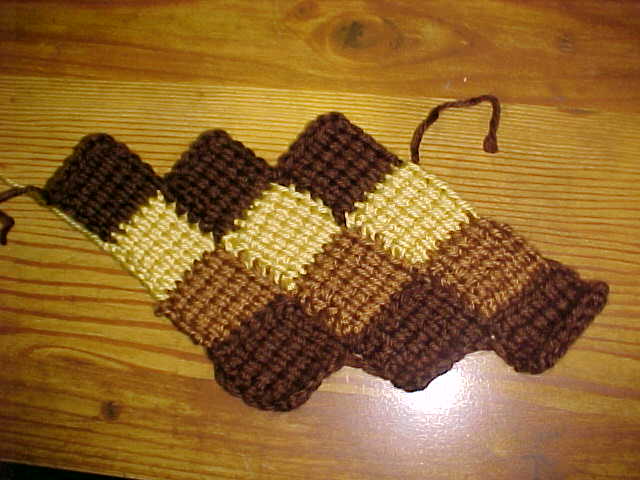
      I had seen this technique and really wanted to learn how to do it. Well, I just learned how to crochet tunisian style and then found directions on how to make Entrelac using the Tunisian crochet method! It is so much fun and so easy breezy!

        You can find the directions using the link above. I started with the bottom 3 brown diamonds and ended with the top 3 brown diamond. As I progressed I improved with my technique and learning where to place the stitches. So, the first gold and last brown row were the best looking.


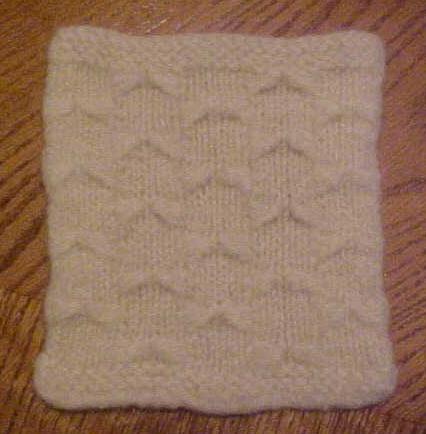
            Here is a close up of the stitch…
            These squares were about 1 and 1/2 inch square. They were made using 5 rows of tunisian regular forward pass and return rows, using 7 stitches per row.

              Of course if I make a purse or afghan the squares would be much larger. I’ll have to figure that out next…LOL

                Anyway, wanted to share and maybe get you excited about trying Tunisian Crochet and Entrelac! I have links for many sites I have found to be helpful in the sidebar on the right under Helpful Crochet/Tunisian Crochet Links

                  There are many Yahoo Groups where you could learn more about both.
                  Some I have joined are listed below:

                    http://groups.yahoo.com/group/tunisiancrochet/

                    http://groups.yahoo.com/group/easytunisian/

                    http://groups.yahoo.com/group/crochetonthedouble/

                    http://groups.yahoo.com/group/Cro-HookCrochet/

                    http://groups.yahoo.com/group/crochenit/

                      Have fun!

                      Candy Corn Dishcloth Number 2

                      <NOT!

                        Candy Corn Dishcloth #2

                            Ok, my husband and son both said that my last Candy Corn dishcloth looked like a flag? Well! I just had to make another one in the shape of candy corn as well… let them call it a flag now…LOL

                              Now, my mom has given me an idea for another one, so I guess my daughter will be overflowing with these candy corn dishcloth’s…LOL

                                Candy Corn Dishcloth

                                <NOT!

                                  Candy Corn Dishcloth

                                      I made this using the Grandma’s Favorite Stitch corner to corner but used different colors, that reminded me of candy corn. This will most likely go to my daughter as she loves candy corn!

                                        The nicest touch I thought was changing the border crocheted edge to match the dishcloth color changes…whooh…glad that’s over…LOL

                                          GF Dishcloth and Scrubbies

                                          <NOT!

                                          My latest creations…another Grandma’s Favorite Dishcloth and a Sunflower and Daisy Scrubbie that are crocheted around a copper and plastic scrubbie. Too cute!


                                          The pattern for the scrubbies is called Flower Scrubbies and you can download the pdf file at www.freepatterns.com
                                          You must sign up to become a member first, but it’s free.

                                          You can find the pattern under Crochet Patterns, Home Decor and then Kitchen Accessories.

                                          My mother has designed a modified version of this pattern where the middle scrubber can be replaced after the old one is worn out. You can find that pattern in the FREE patterns section of Bee Happy Designs or you can download it here and you can also find it in my Box widget here on the blog in the sidebar.


                                          Grandma’s Favorite Dishcloth

                                          <NOT!

                                            Grandma’s Favorite Dishcloth


                                                I had seen this dishcloth called “Grandma’s Favorite” and wanted to try it and just got the chance. It is knit corner to corner…
                                                It is SO EASY! Honest!

                                                  All you do is chain or cable cast on 3 pegs in the middle of your dishcloth rake. You will be doing a garter stitch or one purl row and one knit row throughout. I am right handed so I always purled going from left to right and knitted (e-wrap) going right to left. I don’t think that really makes a difference anyway.


                                                      Once I had those 3 pegs cast on I purled my way back to the right. At this point you increase one peg on both ends. You take that last loop and place it on the next empty peg beside of it. Do the same thing on the left, by taking that far left loop and placing it on the next empty peg beside of it. You have a loop now on pegs 1, 3,4,5 and 7 and an empty peg on pegs 2 and 6. Now going in from the back of your work, pull up the far right back loop and place it on peg 6. Take the back far left loop and place it on peg 2.

                                                        Once you have increased and now have loops on all NOW 7 pegs, e-wrap back to the left, knit off, then purl back to the right.
                                                        Once back at the right, increase again on right and left ends, just like before. Always knitting to the left and purling to the right after each increase. You will just keep doing this until you have 39 pegs wrapped. Your work will come out the back and look like half of a triangle.

                                                          Now to decrease is even easier.
                                                          On that last row where you have loops on all 39 pegs and your working yarn is to the right. Take that last loop on the right and place it on the peg to the left of it. You now have 2 loops on the 38th peg. Do the same thing on the other end. Take the loop on peg 2 and place it on peg 3. (this is really your far left loop, I call it peg 2 because you never have yarn on peg 1 of your 40 peg dishcloth rake)
                                                          Now e-wrap back to the left and when knitting off those pegs with 2 loops just knit them over as one. Remember to purl back to the right.
                                                          Once you have finished that purl row, decrease again, just like before. Do this until you are down to the last 3 pegs and then bind off.

                                                            That’s it, you really will be surprised at how easy it is.

                                                            Knitting for the Board, Loom and Rake by Marla Richard

                                                            <NOT!

                                                            This book is Awesome!

                                                            I just had to sing the praises of this great book by Marla Richard! It is a steal at $21.95 and is worth twice as much as that if not more! I have purchased patterns by Marla before, but she has way outdone herself with this book. There is absolutely no other book on the market for loomers like this one. You have to get it!

                                                            I got my copy today and I am overwhelmed, joyed and estatic at the content that she covers in this book. There is so much information in this book that I will be coming up with new ideas for projects for years! Honestly, I am so pleased with the quality and preparation that had to go into this book. There are tons of color photo’s, charts, as well as detailed instructions on everything from different casting on and binding off methods to dropped stitches, cables and slipped stitches.

                                                            In my opinion this book will become the loomers Bible! You know the book that you will time and time again, go back and pick up and read and refer to. You gotta have it, I’m telling you, you’ll love it! NO I don’t work for Marla and she isn’t paying me to sing her book’s praises….LOL But, if I find something that I think is wonderful, I just have to tell my looming friends about it.

                                                            This is one of those things I just have to pass on…can you tell I love this book yet?
                                                            Marla, thank you, thank you, and did I say thank you!

                                                            Introducing my newest pattern, Double Take Purse!

                                                            My newest design… Double Take Purse
                                                            Available Now!

                                                            $6.95


                                                            This is the blue side…

                                                            Ready for the red side…just turn inside out and poof, a red purse!

                                                            This is the red side…

                                                            Purse is made using the Knifty Knitter looms. It is made in one continuous piece. There is no sewing or piecing together. Both sides have a flat bottom. Process is explained in detail and there are ton’s of photos to help you along.

                                                            My newest knitting boards!

                                                            <NOT!

                                                            I’ve had these for about a week and just haven’t had the time to share them until now. Aren’t they just beautiful? They are knittingboard.com boards. An 18″ and 28″ one. I am planning on making some pretty sweaters, purses, and rugs with them. Can’t wait!

                                                            Oh, and click on the photo as they are giving away this beautiful free pattern!

                                                            Maripositas Stitch Sample After Felting

                                                            <NOT!

                                                            Here is the Maripositas Stitch before and after felting.

                                                            Before Above
                                                            After Below


                                                            I used Fisherman’s Wool and it felted nicely after one wash cycle. It looks so much better in person than it looks in the photo. This particular wool didn’t shrink but maybe 1/2″ in length and 3/4″ in width, which was very surprising. It would make a very nice front to a purse, so I can’t wait to try it on a project after my ten million other projects that I want to do…LOL

                                                            Click here and you can find your Monogram Initial?

                                                            <NOT!


                                                            Many of you have asked me where to get your initial or where I got this one. Well, this one I made myself by using a font on my pc, enlarging it, putting it on a graph using my light box and then writing the pattern out reading the graph from bottom to top.


                                                            ABC’s and 123’s


                                                            I was told about this site above after I had already figured mine out…dang it…LOL
                                                            The only thing is that these even though they are free, they are not loom patterns.


                                                            You can easily change them to a loom pattern by re-writing them. Just change all of the knit’s to purl’s and all of the purl’s to knit’s.
                                                            I hope that helps. Have fun!


                                                            Please remember if you ask me a question by leaving one in the comment section, I can’t email and answer because in the comment section there is no way I know how to contact you. So, if you want to ask me a question just email me at connie@knitknotpurlcurl.com
                                                            Thanks!